When your results depend upon reproducible measurements of protein expression changes, minimize error and variation to maximize the accuracy of your data. Get the most out of your Odyssey Imaging System with these 10 tips for robust and replicable analysis of Western blots.
1. Use the Right Membrane
It is important that you consider a few factors before choosing the appropriate membrane for your experiment. Both PVDF and nitrocellulose membranes are available in two different pore sizes, 0.2 µm for proteins less than 20 kDa, and 0.45 µm for most Western blotting applications. Consider other experimental conditions, as well, such as:
| Condition | PVDF Membranes | Nitrocellulose Membranes |
|---|---|---|
| Protein Binding Capacity | 150-200 µg of protein/cm2 which might result in increased background signal | 80-100 µg of protein/cm2 |
| Membrane Integrity | Less fragile and a better choice for experiments that require stripping and re-probing of membrane | Fragile |
| Transfer Buffer Conditions | PVDF membranes must be pre-wetted with methanol, but can be used with methanol-free transfer buffer | Transfer buffer must contain methanol |
| Detection | Low-fluorescence PVDF must be used for near-infrared fluorescence detection to avoid high background resulting from autofluorescence of standard PVDF membranes. It is recommended that you cut a small sample of membrane and image it both wet and dry, to check for autofluorescence and background. | All nitrocellulose membranes are suitable for near-infrared detection |
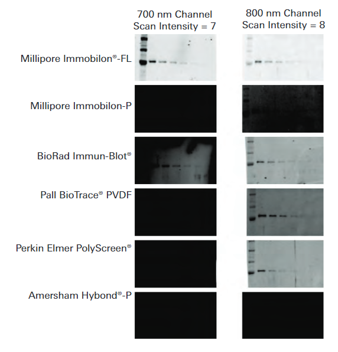
LI-COR has evaluated and compared different transfer membranes types, and overall, nitrocellulose membranes offer the lowest membrane autofluorescence.
The figure at the left shows how membrane autofluorescence from PVDF affects Western blot performance. Transferrin was detected by Western blotting, using various vendors and brands of PVDF membrane. Blots were imaged with the Odyssey® Classic Infrared Imaging System in both the 700 and 800 nm channels.
2. Dry Membrane after Transfer
Once the transfer of proteins from the gel to membrane has been completed, it is recommended that you air-dry the membrane, before proceeding to the blocking step. By letting the membrane air-dry, you are essentially allowing the protein to get “fixed” in place.
This helps ensure that proteins are not lost from the membrane during the subsequent processing steps like washes, blocking, and probing. It will also help retain low abundance proteins, giving you better sensitivity. Also, proteins at higher concentrations will not smear when the membrane is allowed to air-dry.
3. Optimize Blocking Conditions
The right blocking buffer can greatly enhance sensitivity of near-infrared Western blots by reducing background interference, promoting specific binding of primary antibody to target, and yielding high signal-to-noise ratios with minimal non-specific signals.
However, there isn’t a universal blocking buffer suitable for all experimental conditions, so optimization is important. Blocking reagents can influence antibody binding and specificity. For example, milk-based blockers can cause high background when using anti-goat antibodies, streptavidin-biotin based detection, or when probing phosphorylated target proteins.
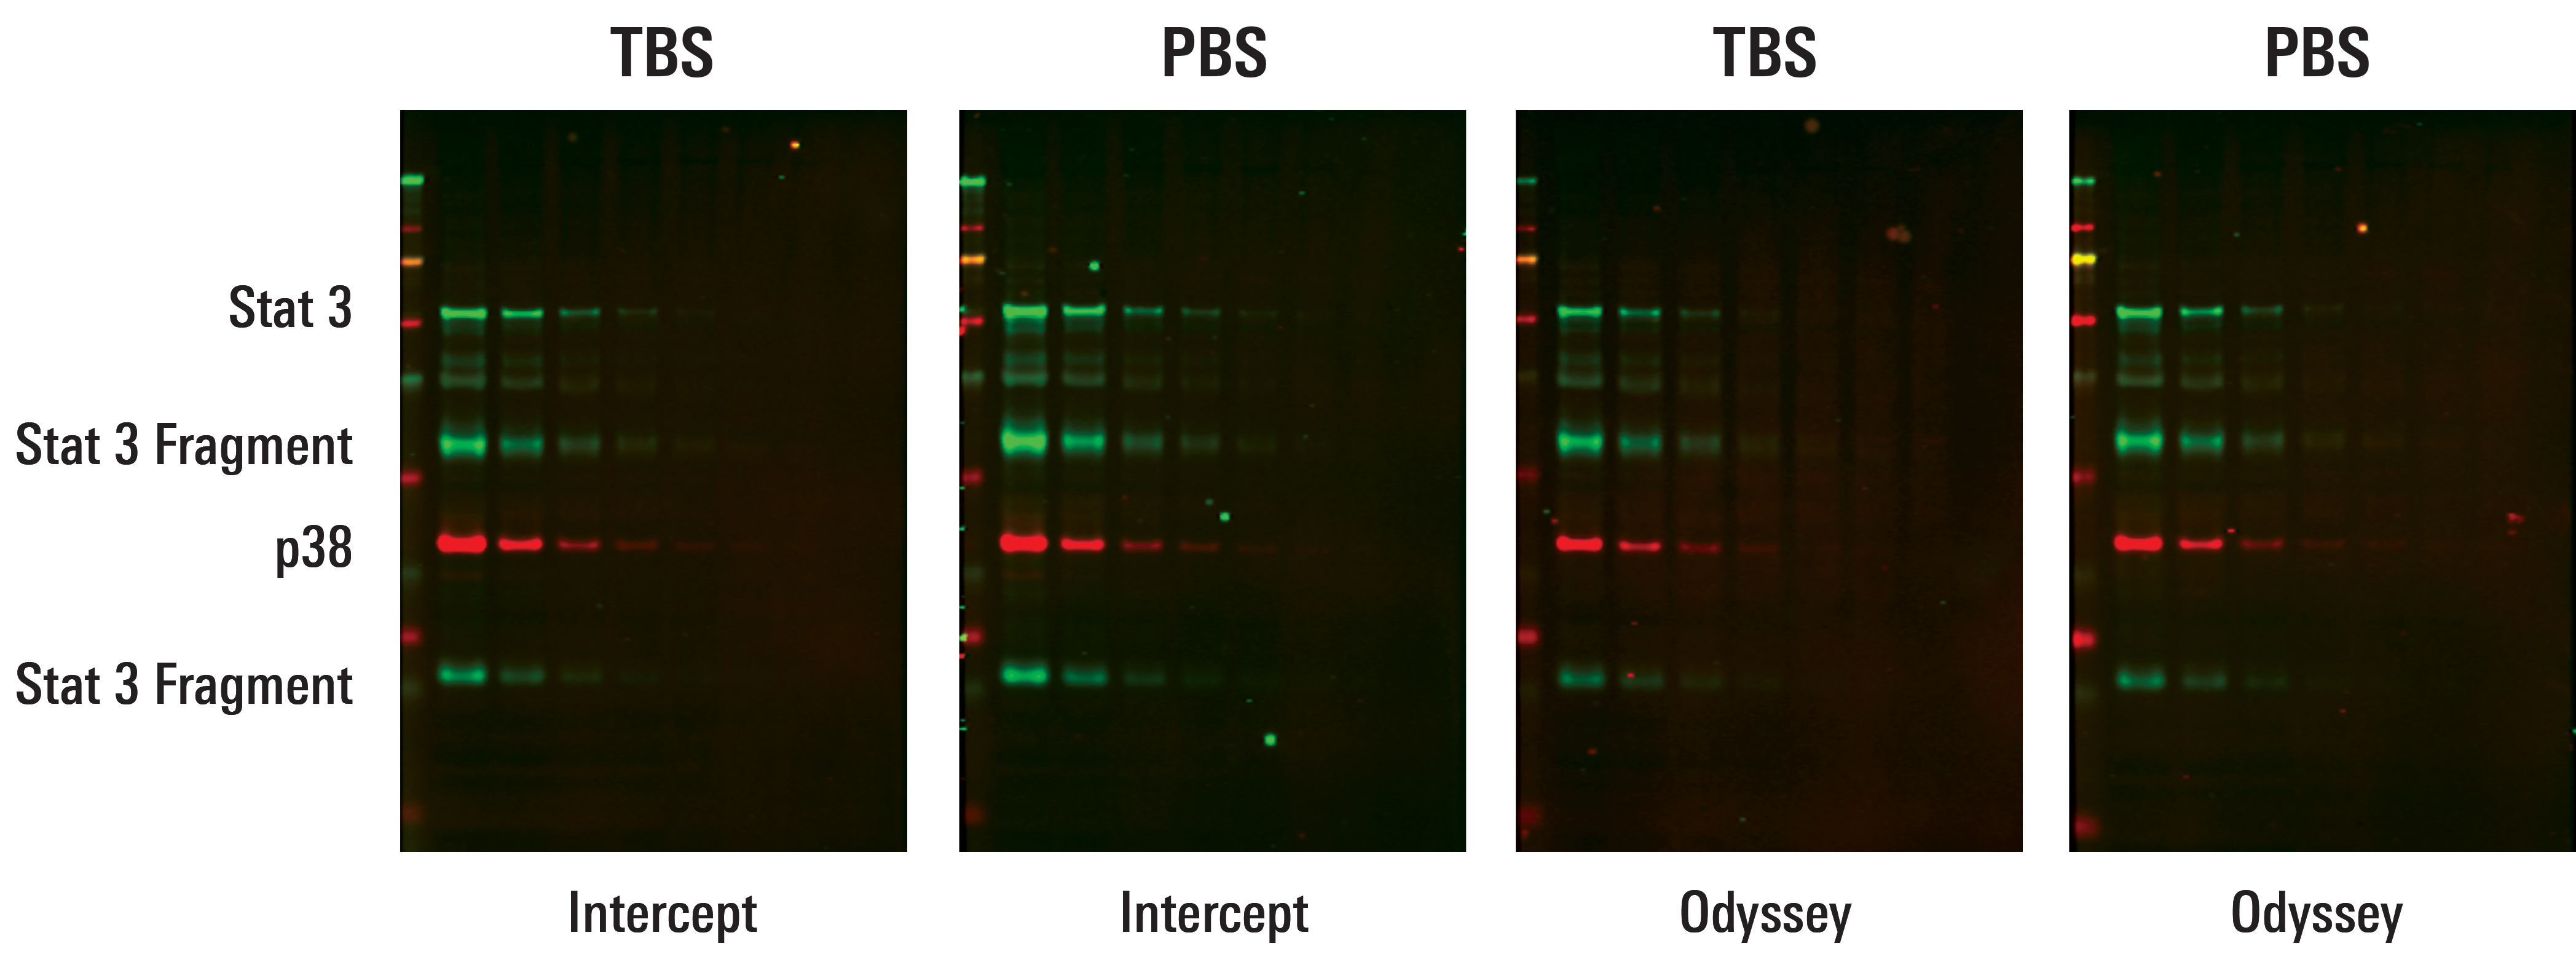
Also consider the buffering system used in the experiment. Washing, blocking, and antibody dilutions must be performed using either Phosphate Buffered Saline (PBS) or Tris Buffered Saline (TBS) consistently throughout the protocol. Additionally, exposure to detergent should be avoided until the blocking step is complete, as it may cause high membrane background.
For more optimization tips, see the Western Blot Blocking Buffer Optimization protocol.
4. Optimize the Dilution of Secondary Antibodies
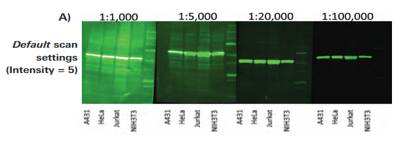
Using secondary antibodies at the right concentration is critical to Western blotting success. Higher dilutions provide lower membrane background and fewer background bands. On the other hand, too much secondary antibody can result in strong bands and signal saturation.
Therefore, it is recommended that you optimize the dilution range for your IRDye® 800CW and IRDye 680RD conjugated secondary antibodies within 1:10,000 to 1:40,000. Ideally, begin with a 1:20,000 dilution and then optimize according to primary antibody and preferred appearance of the blot.
5. Validate Primary Antibodies
As primary antibodies bind directly to the molecule of interest to enable detection, it is critical to ensure that the antibodies are specific and bind with high affinity to the target (and isoform) of interest. A positive and negative control sample can identify non-specific interactions of the antibody. In addition, you may want to knockout the expression of your target to see if the antibody binds to any other proteins within the sample.
Treating cells with growth factors that induce or inhibit expression of the target, or using a blocking peptide to inhibit binding of the antibody to the target protein are some of the other methods used to confirm antibody specificity. When performing validation assays, do not use purified or overexpressed target protein. Also, examine different cell lines or tissues with known levels of expression of the target protein.
6. Determine the Combined Linear Range of Detection
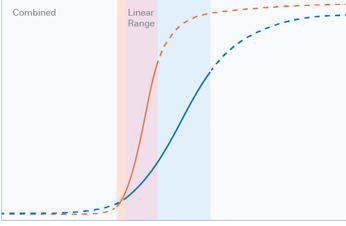
For accurate quantitation of Western blots, it is essential that both the target protein and the internal loading control (whether total protein, housekeeping protein, or modified form of the target) are measured within the combined linear range of detection.
First, the linear range for target and internal loading control need to be determined separately. This can be performed using a dilution series of the sample and the appropriate internal loading control.
The individual loading ranges obtained can then be combined to identify a loading amount within the combined linear range of detection. See the complete step-by-step protocol.
7. Use Proper Experimental Controls
Control samples are essential for generating reliable and reproducible data. Including both a positive and a negative control in your experimental design will serve as helpful checkpoints for accurate target detection. A positive control will help you confirm your antibody specificity to target within the experimental conditions. On the other hand, a negative control will help you identify any non-specific binding.
Most journals recommend including a molecular size marker in Western blot data images submitted for publication. Markers aid in identifying and confirming the target within the expected molecular weight range.
“Positive and negative controls, as well as molecular size markers, should be included on each gel and blot...”
- Image Integrity, Authors and Referees, Nature; Author Guidelines, EMBO Molecular Medicine
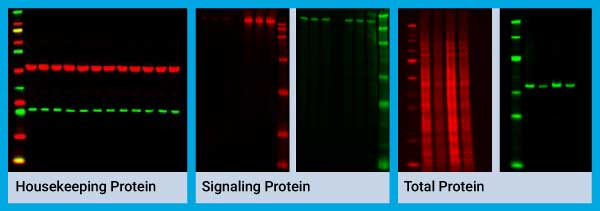
8. Normalize Data to Internal Loading Controls
Normalization corrects for sample-to-sample and lane-to-lane variation by measuring data with reference to internal loading controls. If you do not normalize your samples, any observed changes in band intensity could be a result of error in sample preparation, loading, transfer, or actual experimental conditions.
Housekeeping proteins that have been validated for stable expression, total protein loading amounts, or modified forms of target proteins (e.g., phosphorylated and total) can all be used as internal loading controls. Housekeeping proteins or modified forms of target protein use a single or a few endogenous proteins as reference.
On the other hand, total protein control takes into account the sum total of all proteins loaded within the lane. Learn more about Western blot normalization.
9. Perform Measurements in Replicates
Taking replicate measurements of experimental data are necessary for accurate, reliable results. Both technical and biological replicates help address different questions about data reproducibility.
Technical replicates are repeated measurements of the same sample that represent independent measures of the noise associated with protocols or equipment1. For example, by loading replicate lanes for each sample on a blot or repeating blots with same samples on different days, you can address the reproducibility of the technique.
Biological replicates are parallel measurements of biologically distinct samples that capture biological variation within the system1. For example, using samples derived from different cell types, tissue types, or organisms, you can evaluate if similar results can be observed, or whether your finding is an anomaly.
This protocol - Quantitative Western Blot Analysis with Replicate Samples - will help you define and design your experimental replicate strategy.
10. Use Software That Does Not Modify Raw Data
Accurate data measurement and analysis is the foundation of your research findings. Image file modifications using unsupported image editing and analysis software programs can compromise the integrity of your data. Ensure that you are using a software program designed to analyze and quantify the results of your Western blot experiments that is compatible with your detection system.
Band quantification with Image Studio™ Software does not alter your original image data, leaving your original experimental results secure. With data capture and analysis integrated in a single interface, you can keep variability from file transfers and digital adjustments from affecting your data.
Empiria Studio® Software provides guided workflows to take you from validation through statistical analysis for reliable results.
Keep these ten tips for near-infrared fluorescent Western blots handy. Download this wallpaper for your computer or this flyer for quick references.
Reference:
- Blainey P, Krzywinski M, and Altman N. (2014) Points of Significance: Replication. Nature Methods 11(9): 879-880. doi:10.1038/nmeth.30
Powered by Froala Editor