Operation
Image Gel
If you plan to analyze your gel image in Image Studio™ Software, the following imaging settings are recommended. See Software for the D‑DiGit Gel Scanner.
Exposure time: 4X is a good starting point, but you must adjust as needed for your target.
Image format: 16-bit TIFF
Resolution: 600 dpi
Position Gel
Raise the scanner lid.
Place the gel on the scan surface, and align the center of the gel with the arrow on the front of the scanner.
Ensure the calibration window is clear from obstruction at all times.
Lower the lid.
Before scanning, ensure the scanner lid has been closed tightly to prevent light leakage and poor quality scans.
Scan Gel
The scanner must be unlocked before scanning. See Initial Setup for instructions.
Start D‑DiGit Image Acquisition Software.
Click Image Capture
 on the Main Control Panel to image the gel.
Tip: The default exposure time is 4x. For higher sensitivity, drag the slider bar to the right to increase the exposure time. Drag the slider bar to the left to decrease the exposure time and lower sensitivity.
After a scan is completed, the scanned image will be saved to the folder defined under Settings ![]() . For information about changing the folder location, see Software for the D‑DiGit Gel Scanner.
. For information about changing the folder location, see Software for the D‑DiGit Gel Scanner.
Excising or Observing a Gel
Follow the steps below to observe a gel or excise a band from a gel.
Place the gel on the scan surface.
See Operation for more information.
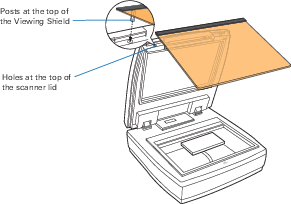
Attach the Viewing Shield to the lid. Insert the posts on the Viewing Shield into the holes on the lid, as shown below.

Before continuing, ensure the Viewing Shield is attached securely. The Viewing Shield should be securely attached to protect your eyes from exposure to light from the blue LED.
Start D‑DiGit Image Acquisition Software.
Click the Light button
 on the Main Control Panel.
The blue LED will automatically move to a predefined position and will illuminate.
The blue LED will stay illuminated for 3 minutes at a time before shutting off to cool down.
After the Light button
 has been clicked, a countdown timer will appear in the software and will start counting down from 3 minutes. After 3 minutes, the blue LED will turn off and the software will prompt you to wait for 2 minutes before using the light again.
Once you are finished, click Light Off to turn off the light and exit the countdown timer.
Prepare Scanner for Shipment
Lock the D‑DiGit Gel Scanner before shipping it.
Ensure the scanner is powered off, and the power cord is unplugged.
With the rear panel of the scanner facing you, tilt the scanner and locate the locking switch underneath the scanner.
Push the locking switch to the right until the "locked" icon is showing, as indicated in the graphic at right.
Do not turn the scanner upside down while engaging the lock switch.

