Import Options
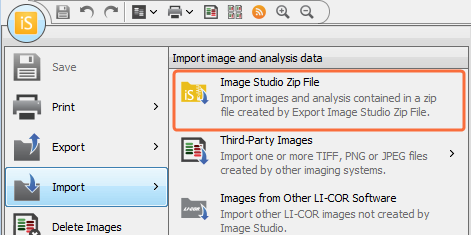
Click the Application button to open the Application menu, then point to Import to view the import options. The following can be imported into Image Studio Software:
Image Studio Zip File: Zip Files are compressed folders containing TIFF images, scan information, and analysis data.
Export Options to learn how to export Zip Files from Image Studio Software.
- Third-Party Images: Individual TIFF, PNG, or JPEG images or folders containing these images.
- Other LI-COR Images: Scan Folders (containing TIFF images and scan information) from other LI-COR Software. Analysis data are not imported.
Import Image Studio Zip File
Click Image Studio Zip File
 on the Import menu.
In the Import Image Studio Zip File dialog, browse to a Zip file and select it.
Multiple Zip Files can be selected.
Click Open. The entire file is imported to the current Work Area.
To import images from older LI‑COR software, click Import and then click Images from Other LI‑COR Software.
Third-Party Images
Image Studio Software can import individual TIFF, PNG, or JPEG images or folders containing these images.
Image Formats to learn about TIFF, JPEG, and PNG image formats and their uses.
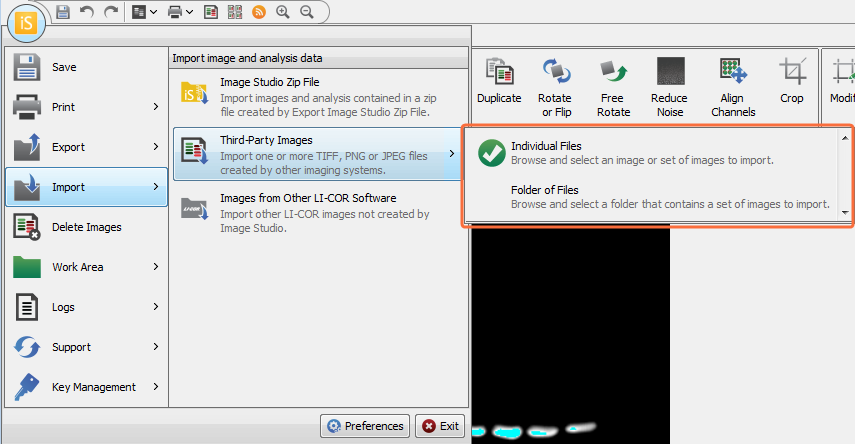
- Point to Third-Party Images
 to see the options Individual Files and Folder of Files.
- Click Individual Files to import TIFF, JPEG, or PNG images.
- Click Folder of Files to import a folder containing TIFF, JPEG, or PNG images.

- Browse to a source folder and select the image or folder containing the images to be imported.
- Click Open.
If the TIFF, JPEG or PNG file cannot be imported, an error message will appear at the bottom of the Image Studio window. If the data is inverted during import, Data Inverted During Import appears in the Image Modifications column.
- The imported file appears in the Images table.
Images from Other LI-COR Software
Click Images from Other LI-COR Software ![]() on the Import menu to open the Import Other LI-COR Images dialog.
on the Import menu to open the Import Other LI-COR Images dialog.

See instructions below for how to import folders using each software option.
Use the following procedure to import one or more Scan Folders from:
Scan Folders will be copied to the current default directory, and the images will appear in the Images table.
Analysis data are not imported.
Click Odyssey Application Software Images, Odyssey Sa Software Images, or Aerius Software images in the Import Other LI-COR Images dialog.

The appropriate import dialog will open (the Odyssey import dialog is shown as an example).
- Browse to a Scan Folder and click to select it. Multiple Scan Folders can be selected and imported.
- Click Open.
- The Scan Folders will be imported and the images will be added to the Images table.

Use the following to import one or more Acquisition Folders from Pearl Cam Software.
- Click Pearl Software Images in the Import Other LI-COR Images dialog.
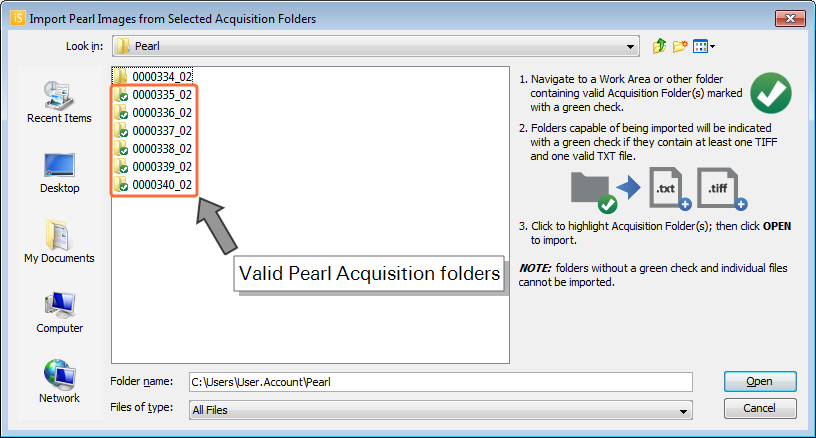
- Browse to a valid Acquisition Folder and click to select it. Multiple Acquisition Folders can be selected and imported.
- Click Open.
- The Acquisition Folders will be imported and the images will be added to the Images table.
The Import Pearl Images from Selected Acquisition Folders dialog is displayed.
